
START WINDOWS 10 SAFE MODE

Start Safe Mode directly from Windows
  1. Click the Windows-button → Power.
  2. Hold down the shift key and click Restart.
  3. Click the option Troubleshoot and then Advanced options.

    windows8_1_troubleshoot_advanced-option_en.jpg
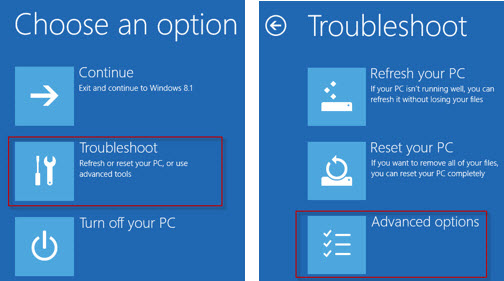
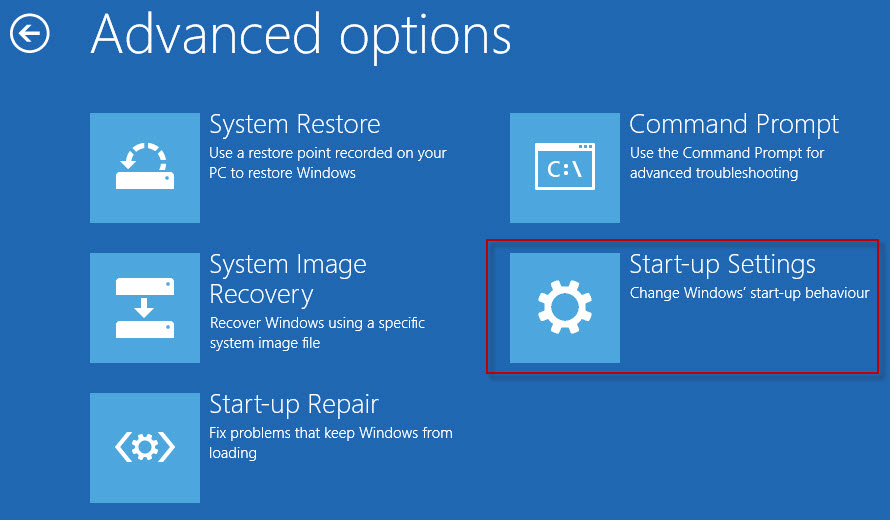
  4. Go to “Advanced options” and click Start-up Settings.

    windows8_1_start-up_Settings_en.jpg
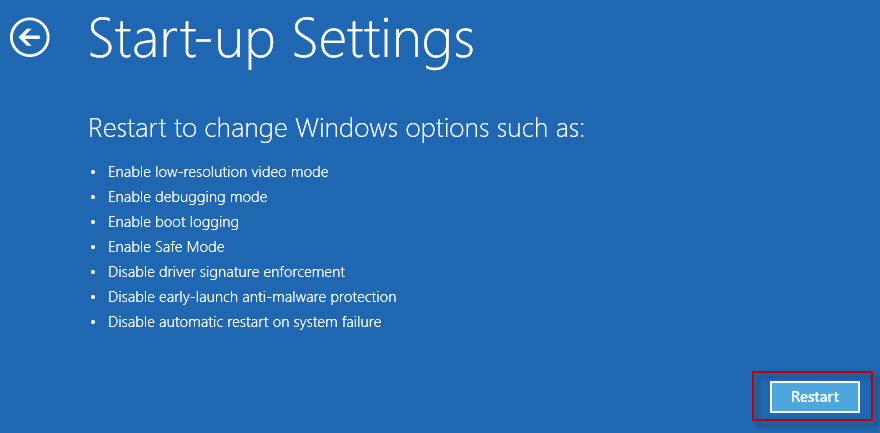
  5. Under “Start-up Settings” click Restart.

    restart.jpg
  6. Various boot options are displayed.
    The relevant options for booting in Safe Mode are numbers, 4,5, or 6.
    Select an option by pressing one of the numbers or function keys F4, F5 or F6
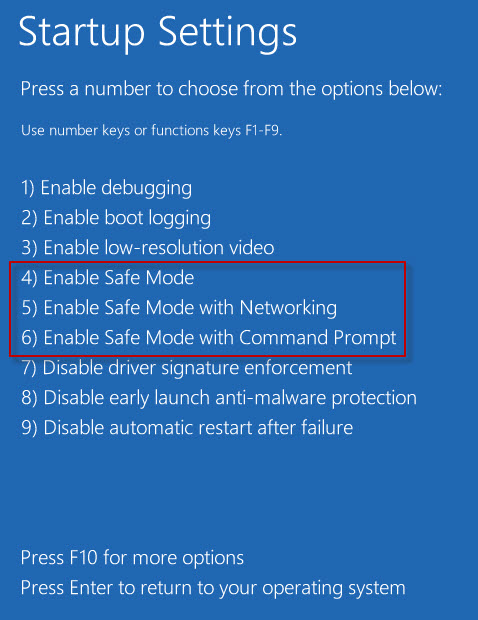
    windows8_1_enable-safe-mode_startup-settings.jpg
    4) Enable Safe Mode
    In this mode, the operating system is started with the bare minimum of installed drivers and only the main Windows functions are used.

    5) Enable Safe Mode with Networking
    In this mode, the network drivers are also started.

    6) Enable Safe Mode with Command Prompt
    In this mode, the operating system is started in text mode. This mode requires knowledge of computer commands and is, therefore, more suitable for professional users.
  7. Windows 10 starts in Safe Mode.

Comments

Popular posts from this blog

[RAID] SWITCH FROM AHCI TO RAID WITH INTEL C600 CONTROLLER

I personally have used other ways to do this. Manipulating some registry settings in combination with a safe boot before booting normally does the trick as well. This works with both SATA SSD and M.2 NVMe drives and it enables relatively fast switching between back and forth between AHCI and RAID. I have described this method below.  I have also tried the same process used to switch from RAD to AHCI and that works as well. Switch to safe boot Reboot into BIOS Change from AHCI to RAID in the BIOS Boot into safe mode Turn off safe mode and reboot normally again Nothing else and that also did the trick, just like with moving from RAID to AHCI.  So the link above and my step by step below is here for completeness. You have options in case one of them doesn’t work! Step by step AHCI to RAID registry method This procedure I describe below works on Windows 10 1803/1809 and has been tested on Dell Latitude E6220 an XPS 13 9360. Editing the registry is always a little risky if you

ERROR: MAPIEXCEPTIONNOTFOUND: UNABLE TO SYNCHRONIZE MANIFEST.

 Fatal error MapiExceptionNotFound has occurred. Error details: MapiExceptionNotFound: Unable to synchronize manifest. (hr=0x8004010f, ec=-2147221233) This error will appear due to mailbox corruption to eliminate the above error need repair the mailbox  execute the following shell command then clear the move request and initiate again move request   New-MailboxRepairRequest -Mailbox userID -CorruptionType SearchFolder, AggregateCounts, ProvisionedFolder, FolderView

[Hyper-V] - Lỗi không boot vào được sau khi convert máy vật lý sang máy ảo

XỬ LÝ LỖI KHÔNG BOOT ĐƯỢC VÀO MÁY ẢO SAU KHI CONVERT TỪ MÁY VẬT LÝ BẰNG DISK2VHD Sau khi convert server vật lý sang file VHD để import vào Hyper thì khi start máy ảo lên màn hình máy ảo chỉ nhấp nháy con trỏ chuột trên màn hình đen (blinking cursor) NGUYÊN NHÂN Do máy vật lý sử dụng ổ đĩa cài OS được format theo chuẩn GPT (thay vì MBR như truyền thống, tham khảo GPT và MBR ) XỬ LÝ Bước 1: chuyển ổ GPT thành MBR Copy file VHD của ổ đĩa chứa OS về 1 máy tính Windows 8 trở lên Trên máy Windows 8+ click phải chuột lên file VHD vừa copy, chọn lệnh Mount . Lúc này dùng 1 phần mềm miễn phí (vd: Mini Partition Wizard ) để convert ổ đĩa vừa mount từ GPT  -> MBR Sau đó Delete phần Partition dư ra ở phần đầu ổ đĩa được mount (khoảng vài trăm MB) Set " Active " cho ổ đĩa này để là ổ đĩa boot OS Nhấn Apply để phần mềm thực thi tác vụ Sau khi phần mềm làm xong, tắt phần mềm Mini Partition Wizard, vào My Computer chọn eject ổ đĩa đang mount . Copy file VHD vừa đư