
KẾT NỐI PGADMIN VÀO POSTGRESQL

Source: https://oneit.com.vn/2021/12/08/huong-dan-ket-noi-pgadmin-vao-postgresql/


Đầu tiên cần xem tình trạng dịch vụ của Postgresql.

service postgresql status

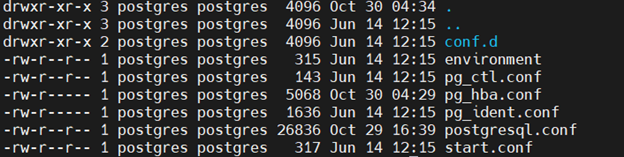
Access vào file thư mục config của Postgresql

cd /etc/postgresql/12/main/

Tại đây có thể thấy danh sách các file cấu hình cấu thiết gồm: “pg_hba.config” và “postgresql.conf”.

Sử dụng vi hoặc nano để xem qua các file cấu hình này. Trước tiên ta access vào file “pg_hba.conf”

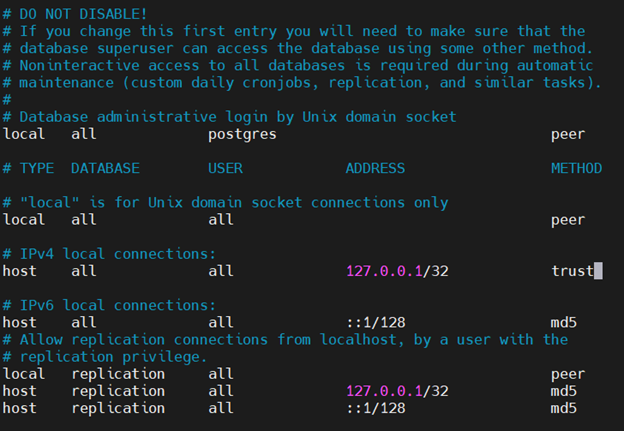
Trong thông tin file “pg_hba.conf”, đây là thông tin liên quan đến các cấu hình kết nối mặc định của server postgresql.

Tại dòng khu vực IPv4 , thêm 1 dòng chứa kết nối của client cần kết nối vào server:

TypeDatabaseUserIP AddressMethod
hostallall192.168.0.30/32trust

Ý nghĩa của việc dòng cấu hình này là: Cho phép duy nhất IP 192.168.0.30 truy cập vào tất cả DB của server postgresql.

Sau khi hoàn tất, tiến hành save lại file cấu hình “pg_hba.conf” và tiếp tục access vào file “postgresql.conf”. Như hình bên dưới, xem xét tình trạng dòng 59

#listen_addresses = ‘localhost'

Để có thể truy nhập từ bên ngoài vào, cần phải thay đổi cấu hình tại đây. Nếu để mặc định, hệ thống tự cho phép các dịch vụ chạy trên server này được phép kết nối với chính Database local.

Chuyển đổi bỏ dấu ‘#’ và ở đầu dòng và thay thế ‘locahost’ thành ‘*’. Ý nghĩa là chấp nhận các kết nối đến server postgresql này. Hoặc có thể thay thế ‘*’ thành 1 IP nào đó, ví dụ là 192.168.0.30 như tại file cấu hình “pg_hba.conf”.

Sau khi hoàn tất cấu hình file “pg_hba.conf” và “postgresql.conf”, tiến hành restart lại dịch vụ postgresql.

service postgresql restart


Comments

Popular posts from this blog

[RAID] SWITCH FROM AHCI TO RAID WITH INTEL C600 CONTROLLER

I personally have used other ways to do this. Manipulating some registry settings in combination with a safe boot before booting normally does the trick as well. This works with both SATA SSD and M.2 NVMe drives and it enables relatively fast switching between back and forth between AHCI and RAID. I have described this method below.  I have also tried the same process used to switch from RAD to AHCI and that works as well. Switch to safe boot Reboot into BIOS Change from AHCI to RAID in the BIOS Boot into safe mode Turn off safe mode and reboot normally again Nothing else and that also did the trick, just like with moving from RAID to AHCI.  So the link above and my step by step below is here for completeness. You have options in case one of them doesn’t work! Step by step AHCI to RAID registry method This procedure I describe below works on Windows 10 1803/1809 and has been tested on Dell Latitude E6220 an XPS 13 9360. Editing the registry is...

[Hyper-V] - Lỗi không boot vào được sau khi convert máy vật lý sang máy ảo

XỬ LÝ LỖI KHÔNG BOOT ĐƯỢC VÀO MÁY ẢO SAU KHI CONVERT TỪ MÁY VẬT LÝ BẰNG DISK2VHD Sau khi convert server vật lý sang file VHD để import vào Hyper thì khi start máy ảo lên màn hình máy ảo chỉ nhấp nháy con trỏ chuột trên màn hình đen (blinking cursor) NGUYÊN NHÂN Do máy vật lý sử dụng ổ đĩa cài OS được format theo chuẩn GPT (thay vì MBR như truyền thống, tham khảo GPT và MBR ) XỬ LÝ Bước 1: chuyển ổ GPT thành MBR Copy file VHD của ổ đĩa chứa OS về 1 máy tính Windows 8 trở lên Trên máy Windows 8+ click phải chuột lên file VHD vừa copy, chọn lệnh Mount . Lúc này dùng 1 phần mềm miễn phí (vd: Mini Partition Wizard ) để convert ổ đĩa vừa mount từ GPT  -> MBR Sau đó Delete phần Partition dư ra ở phần đầu ổ đĩa được mount (khoảng vài trăm MB) Set " Active " cho ổ đĩa này để là ổ đĩa boot OS Nhấn Apply để phần mềm thực thi tác vụ Sau khi phần mềm làm xong, tắt phần mềm Mini Partition Wizard, vào My Computer chọn eject ổ đĩa đang mount . Copy file VHD vừa đư...

TẠO DKIM RECORD CHO EXCHANGE SERVER

  Source: https://www.linkedin.com/pulse/how-configure-dkim-exchange-2019-simple-way-seyed-abdollahi Installation In Exchange Online DKIM is a built-in service, but on an on-prem Exchange 2019 deployment we need a 3rd party application to add this functionality to our Exchange infrastructure. In this guide we use Stefan Profanter's excellent dkim-exchange application for this purpose, which is available here:  https://github.com/Pro/dkim-exchange/releases/latest After installing the program, we open  Configuration.DkimSigner.exe and click on the "Install" button, or download the installer straight from https://codeload.github.com/Pro/dkim-exchange/legacy.zip/v*** Configuration After installation finished, open the configurator. C:\Program Files\Exchange DkimSigner\Configuration.DkimSigner.exe Click on the "Configure" button and move the DkimSigner agent to the very bottom of the list. Under the DKIM settings tab select relaxed canonicalization as Exchange t...