
Verification of outbound replicaton failed. Error reading the NTDS settings on replication source domain


DC userAccountControl 0x81000

Cả bài viết dài, chỉ cần quan tâm đúng 1 dòng highlight dưới cùng là tháo gỡ nút thắt cả hệ thống


Got a question from a friend about a weird problem when trying to promote a 2012R2 Domain Controller.

The error is in the prereq test before promoting:

Verification of outbound replicaton failed. Error reading the NTDS settings on replication source domain controller 2k3dc.secid.local. Domain Controller data not found for the specified Active Directory domain controller.

prereq

And I also got the info that the 2k3DC only was a member of the Domain Users group. That’s not easy to change in the ADUC tool, Member Of Tab in the computer object. Something weird was going on.

From DCDIAG.EXE I got the following info:

Starting test: MachineAccount
The account 2K3DC is not a DC account.  It cannot replicate.
Warning:  Attribute userAccountControl of 2K3DC is: 0x81000 = ( UF_WORKSTATION_TRUST_ACCOUNT | UF_TRUSTED_FOR_DELEGATION )
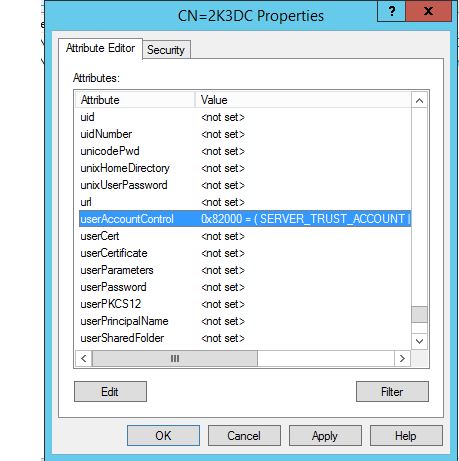
Typical setting for a DC is 0x82000 = ( UF_SERVER_TRUST_ACCOUNT | UF_TRUSTED_FOR_DELEGATION )
This may be affecting replication?
……………………. 2K3DC failed test MachineAccount

Indeed as the error message says, it could affect replication, and it did 🙂

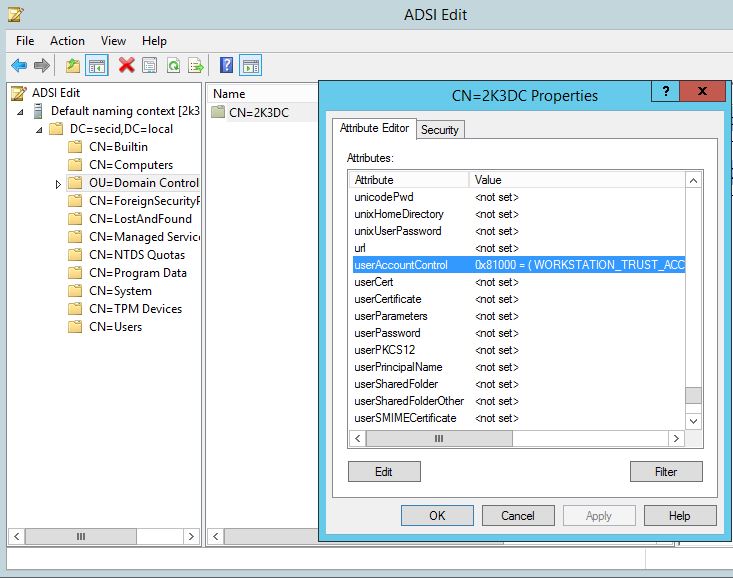
In ADSI Edit we can connect to the Default Naming Context and open the properties of the computer object and see that the userAccountControl attribute has the hex value: 0x81000 = (WORKSTATION_TRUST_ACCOUNT|TRUSTED_FOR_DELEGATION)

UACwrong

A common problem when a computer account is prestaged would be that the DC has this value: 0x82020 = (UF_PASSWD_NOTREQD|UF_SERVER_TRUST_ACCOUNT|UF_TRUSTED_FOR_DELEGATION).

So how do we solve it? If you read KB305144:

These are the default UserAccountControl values for the certain objects:

Typical user : 0x200 (512)
Domain controller : 0x82000 (532480)
Workstation/server: 0x1000 (4096)
In ADSI Edit, edit the userAccountControl attribute with the 532480 decimal value and now it’s changed to: 0x82000 = (UF_SERVER_TRUST_ACCOUNT|UF_TRUSTED_FOR_DELEGATION)
UACCorrect
And in this case, the computer object is now a member of the Domain Controllers group, no errors in dcdiag and the dcpromo succeeded.

Comments

Popular posts from this blog

[RAID] SWITCH FROM AHCI TO RAID WITH INTEL C600 CONTROLLER

I personally have used other ways to do this. Manipulating some registry settings in combination with a safe boot before booting normally does the trick as well. This works with both SATA SSD and M.2 NVMe drives and it enables relatively fast switching between back and forth between AHCI and RAID. I have described this method below.  I have also tried the same process used to switch from RAD to AHCI and that works as well. Switch to safe boot Reboot into BIOS Change from AHCI to RAID in the BIOS Boot into safe mode Turn off safe mode and reboot normally again Nothing else and that also did the trick, just like with moving from RAID to AHCI.  So the link above and my step by step below is here for completeness. You have options in case one of them doesn’t work! Step by step AHCI to RAID registry method This procedure I describe below works on Windows 10 1803/1809 and has been tested on Dell Latitude E6220 an XPS 13 9360. Editing the registry is...

TẠO DKIM RECORD CHO EXCHANGE SERVER

  Source: https://www.linkedin.com/pulse/how-configure-dkim-exchange-2019-simple-way-seyed-abdollahi Installation In Exchange Online DKIM is a built-in service, but on an on-prem Exchange 2019 deployment we need a 3rd party application to add this functionality to our Exchange infrastructure. In this guide we use Stefan Profanter's excellent dkim-exchange application for this purpose, which is available here:  https://github.com/Pro/dkim-exchange/releases/latest After installing the program, we open  Configuration.DkimSigner.exe and click on the "Install" button, or download the installer straight from https://codeload.github.com/Pro/dkim-exchange/legacy.zip/v*** Configuration After installation finished, open the configurator. C:\Program Files\Exchange DkimSigner\Configuration.DkimSigner.exe Click on the "Configure" button and move the DkimSigner agent to the very bottom of the list. Under the DKIM settings tab select relaxed canonicalization as Exchange t...

GIA HẠN SSL CHO EXCHANGE SERVER 2019

LINK: https://www.alitajran.com/create-certificate-exchange-server/#h-step-2-generate-exchange-certificate-request  ==Create request SSL New-ExchangeCertificate -Server "EXIDC1" -GenerateRequest -FriendlyName "EXCERT2025" -PrivateKeyExportable $true -SubjectName "c=VN, s=HCM, l=HCM, o=TTT, ou=IT, cn=mail.ttt.vn" -DomainName mail.ttt.vn,autodiscover.ttt.vn,autodiscover.saigonxanh.com,autodiscover.mpu.edu.vn ==Complete SSL Import-ExchangeCertificate -FileData ([System.IO.File]::ReadAllBytes('\\exidc1\Cert$\2378696128.crt')) -PrivateKeyExportable:$true -Password (ConvertTo-SecureString -String 'tttcompany' -AsPlainText -Force)